Bulk Signature Sending
Need to send the same document to dozens — or hundreds — of recipients, each with their own personalized details and signature fields? The Bulk Send wizard lets you do exactly that, right from the TurboDocx UI. Upload a spreadsheet, map your columns, preview the results, and submit the entire batch in minutes.
What You'll Learn
- 📊 Upload a spreadsheet (CSV or XLSX) with recipient data
- 🔗 Map columns to template variables automatically or manually
- ✏️ Configure signature fields with types, defaults, and recipient assignments
- 👁️ Preview merged documents before sending
- 📤 Submit batches and monitor progress
- 📈 Track batch status from the Batches dashboard
Bulk Signature Sending is available exclusively on the Pro plan. If you're on a free or starter plan, clicking the Bulk Send button will prompt you to upgrade. Learn more about Pro plan features.
Before You Begin
To use Bulk Signature Sending, you'll need:
- Pro plan — the feature is gated to Pro subscribers
- A TurboDocx template — with variables (placeholders) that correspond to columns in your spreadsheet
- A spreadsheet — CSV (
.csv) or Excel (.xlsx) file with one row per recipient/document - Sufficient signature credits — each recipient in each document consumes 1 credit
Make sure your spreadsheet has clear column headers that match (or are close to) your template's placeholder names. The wizard will try to auto-match them, but clean headers make the process much faster.
Step 1: Open the Bulk Send Wizard
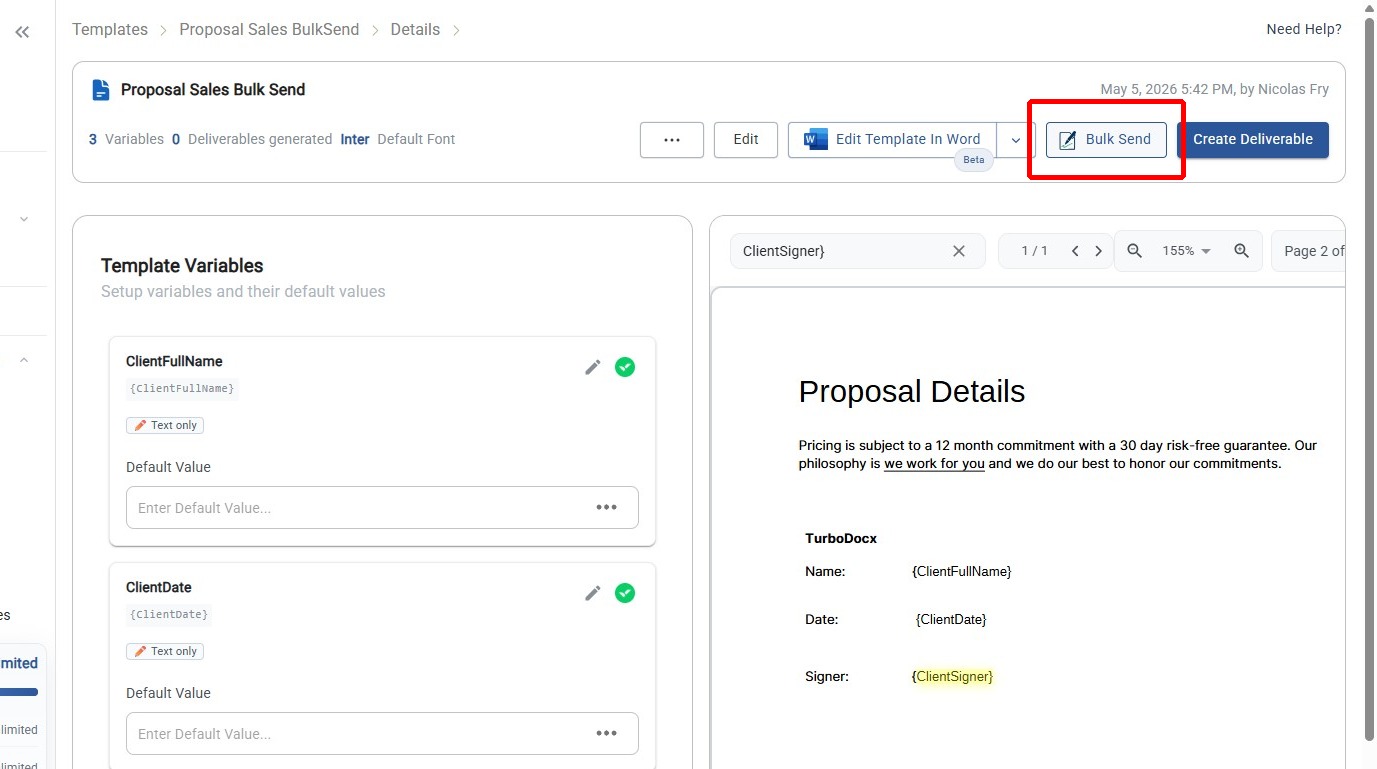
Navigate to the Edit Template & Preferences page for the template you want to send in bulk. You'll see a "Bulk Send" button alongside the other template actions.
Click "Bulk Send" to open the wizard.
If your organization doesn't have the Pro plan, the Bulk Send button displays an upgrade badge. Clicking it opens the upgrade dialog instead of the wizard.
Step 2: Upload Your Spreadsheet
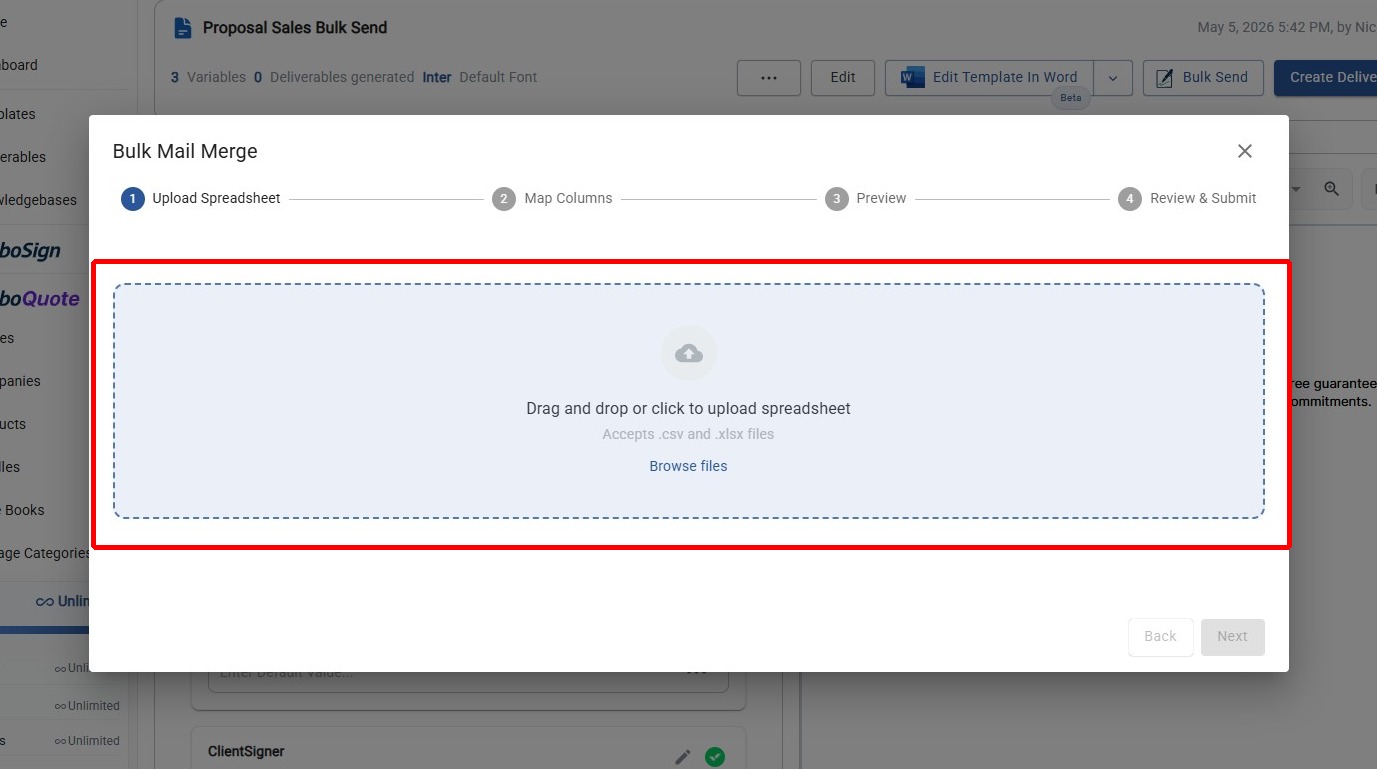
The first step of the wizard is uploading your recipient data.
How to Upload
- Drag and drop your file onto the upload area, or
- Click to browse and select a file from your computer
Supported Formats
| Format | Extension | Notes |
|---|---|---|
| CSV | .csv | Comma-separated values |
| Excel | .xlsx | Multi-sheet support — select which sheet to use |
What You'll See
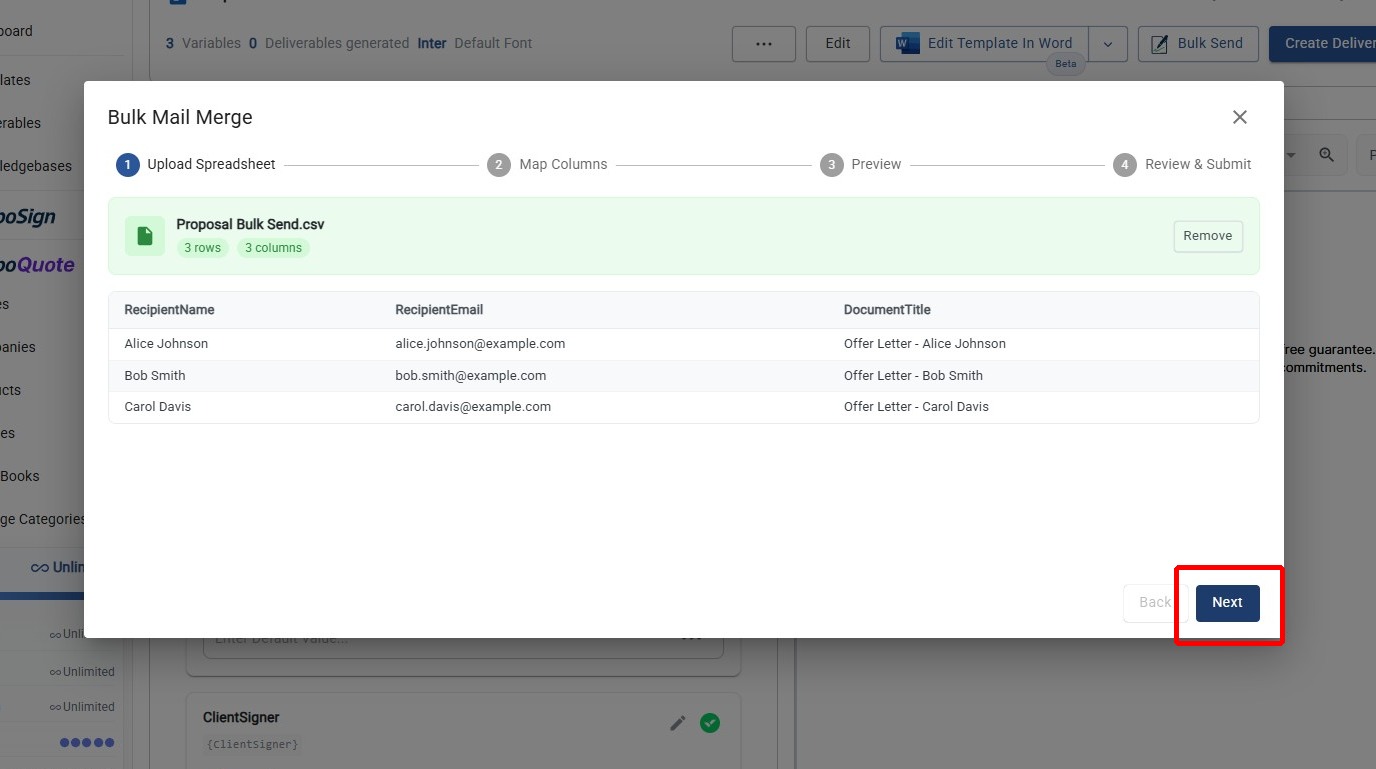
After uploading, the wizard displays:
- File name and format confirmation
- Sheet selector (for Excel files with multiple sheets)
- Preview table showing the first 5 rows of your data with column headers
Review the preview table to confirm your data looks correct, then click Next.
- Headers matter — the first row of your spreadsheet should contain column headers, not data
- Keep it clean — remove empty rows or columns before uploading
- Check encoding — for CSV files, use UTF-8 encoding to avoid character issues
Step 3: Map Columns & Configure Recipients
This is the most important step. Here you'll connect your spreadsheet data to your template's placeholders, set up signature fields, and define who receives each document.
3a. Map Template Variables
Each template variable (placeholder) needs to be resolved — either by mapping it to a spreadsheet column or by designating it as a signature field.
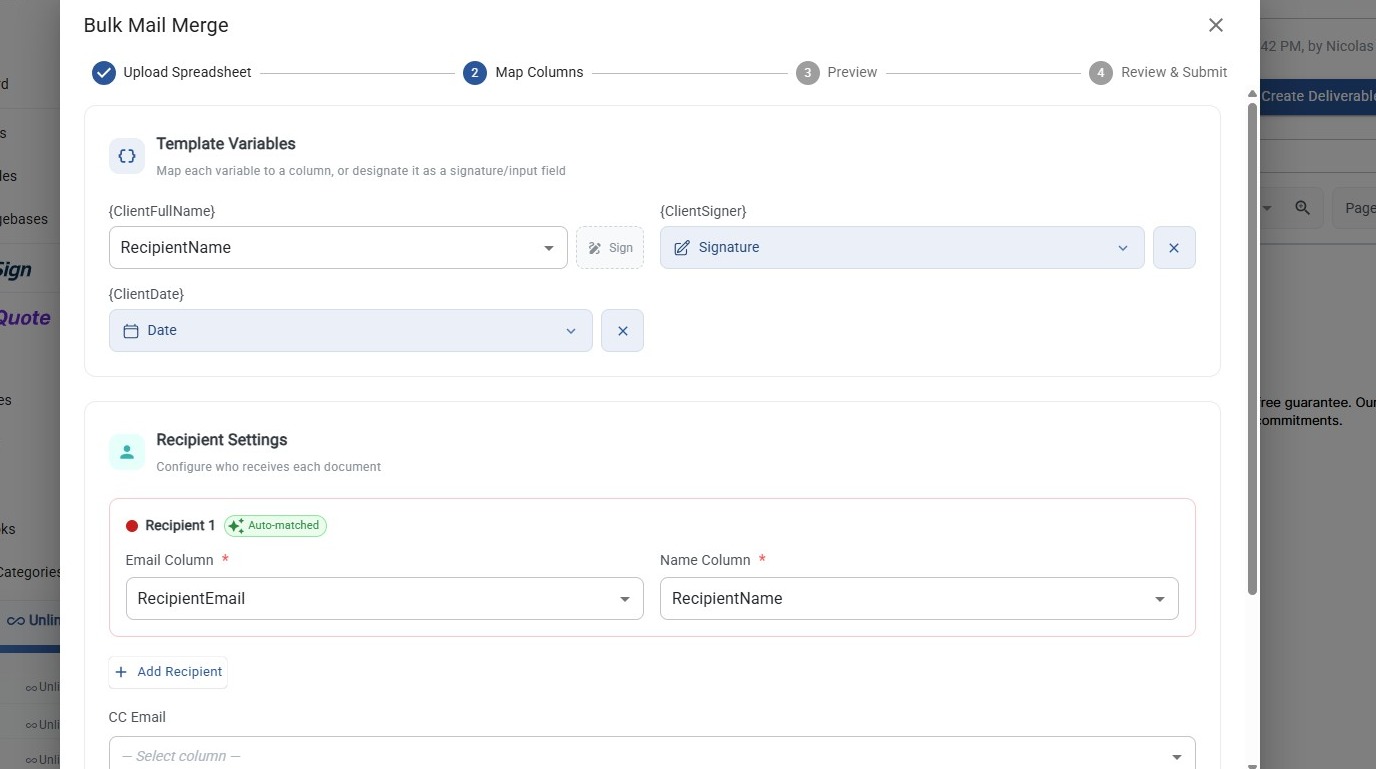
Auto-Matching: The wizard automatically attempts to match your column headers to template placeholders using fuzzy matching. For example, a column named client_email would auto-match to a {clientEmail} placeholder. Auto-matched mappings display an "Auto-matched" chip.
Manual Override: You can always override an auto-match by selecting a different column from the dropdown.
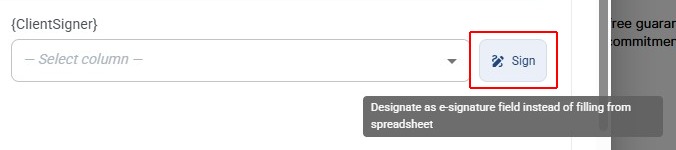
Signature Field Option: Instead of mapping a variable to a column, you can click the "Sign" button next to a variable to designate it as a signature field — meaning it becomes a field that the recipient fills in or signs during the signing process.
3b. Configure Signature Fields
For any variable designated as a signature field, you'll configure:
Field Type — choose from the following:
| Field Type | Description |
|---|---|
| Signature | Full signature capture |
| Initial | Initials field |
| Date | Date picker |
| Name | Full name text field |
| First Name | First name only |
| Last Name | Last name only |
| Email address field | |
| Title | Job title field |
| Company | Company name field |
| Text Input | Free-form text entry |
| Checkbox | Checkbox confirmation |
Recipient Assignment — assign the field to a specific recipient (signer).
Optional Settings:
- Default Value — pre-fill the field with a value the signer can review or edit
- Read Only — lock the field so the signer can see it but not change it (requires a default value)
- Multiline — for text fields, allow multi-line input
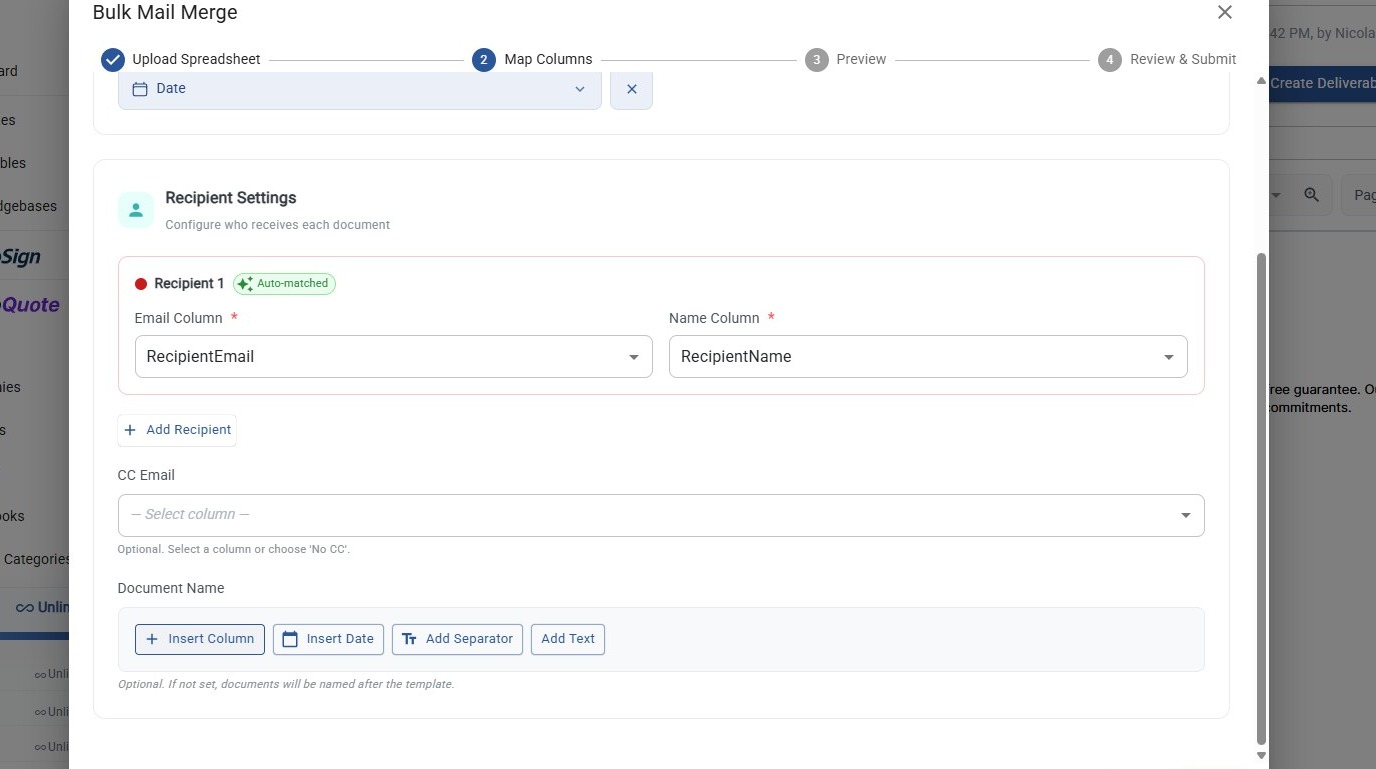
3c. Add Recipients
Define who signs each document by mapping spreadsheet columns to recipient slots.
For each recipient, configure:
- Email Column — which spreadsheet column contains their email address
- Name Column — which spreadsheet column contains their name
Additional options:
- Multiple Recipients — click "Add Recipient" to add up to 10 signers per document. Each recipient is color-coded for easy visual identification
- CC Email Column — optionally select a column containing CC email addresses (supports comma or semicolon-separated lists for multiple CCs per row)
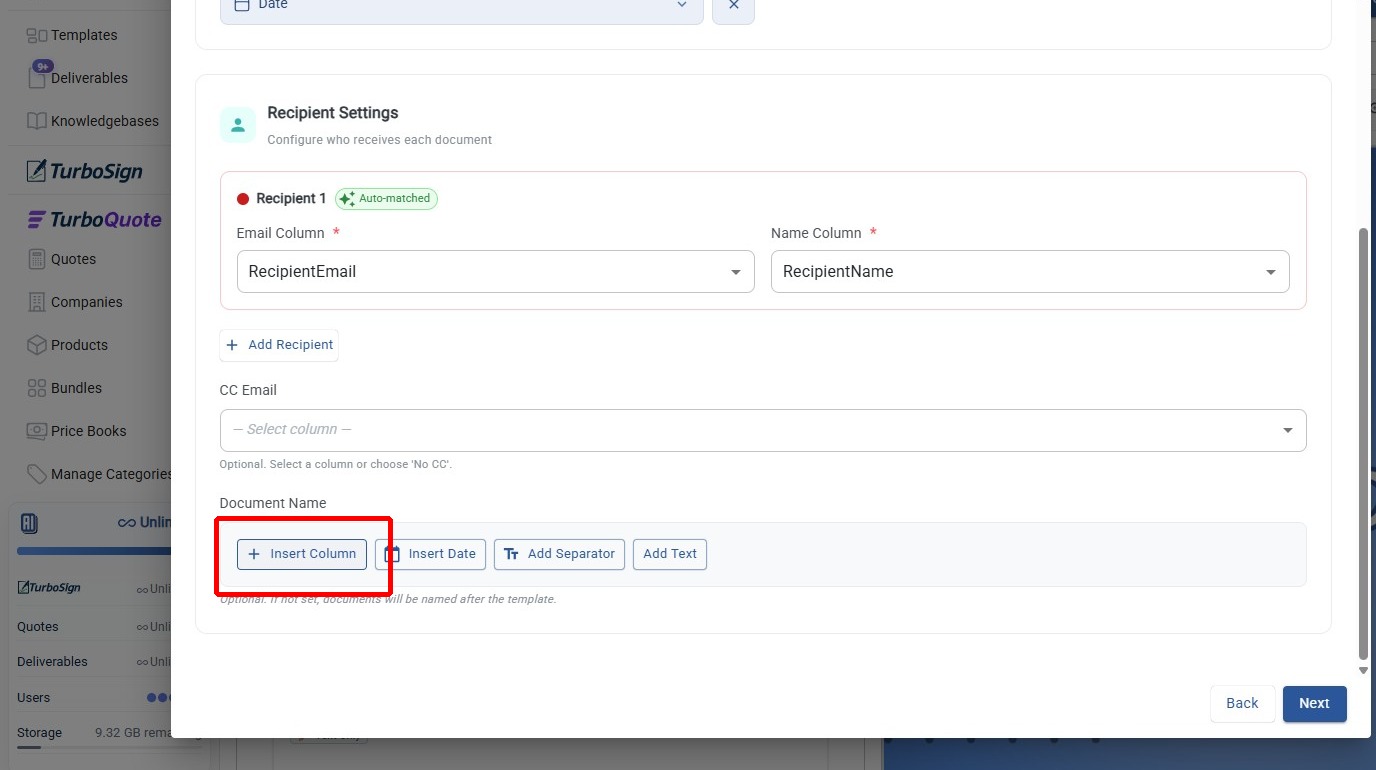
3d. Document Naming (Optional)
Build dynamic document names for each generated document using the name builder toolbar:
- Insert Column — pull in a value from your spreadsheet (e.g., a "DocumentTitle" column)
- Insert Date — append the current date
- Add Separator — insert a separator character (hyphen, underscore, slash, etc.)
- Static text — type fixed text directly
Drag segments to reorder them. The wizard shows a live preview of the resulting document name using data from your first row.
3e. Validation
The wizard validates your configuration before allowing you to proceed. If there are issues, you'll see red alert banners explaining what needs to be fixed.
Common validation requirements:
| Requirement | What It Means |
|---|---|
| At least one signature field | You need at least one variable designated as a signature field |
| All variables resolved | Every template variable must either map to a column, be a signature field, or explicitly set to empty |
| Recipient email & name mapped | Each recipient slot needs both an email and name column |
| Valid email addresses | All emails in mapped email columns must be valid |
| Each recipient has a signature field | Every recipient needs at least one field assigned to them |
| Editable fields per recipient | Each recipient must have at least one field that isn't read-only |
| Read-only fields need defaults | Any read-only field must have a default value set |
Read each alert carefully — they tell you exactly which recipient or field has the issue. Most problems are resolved by assigning a missing column mapping or adding a signature field to a recipient.
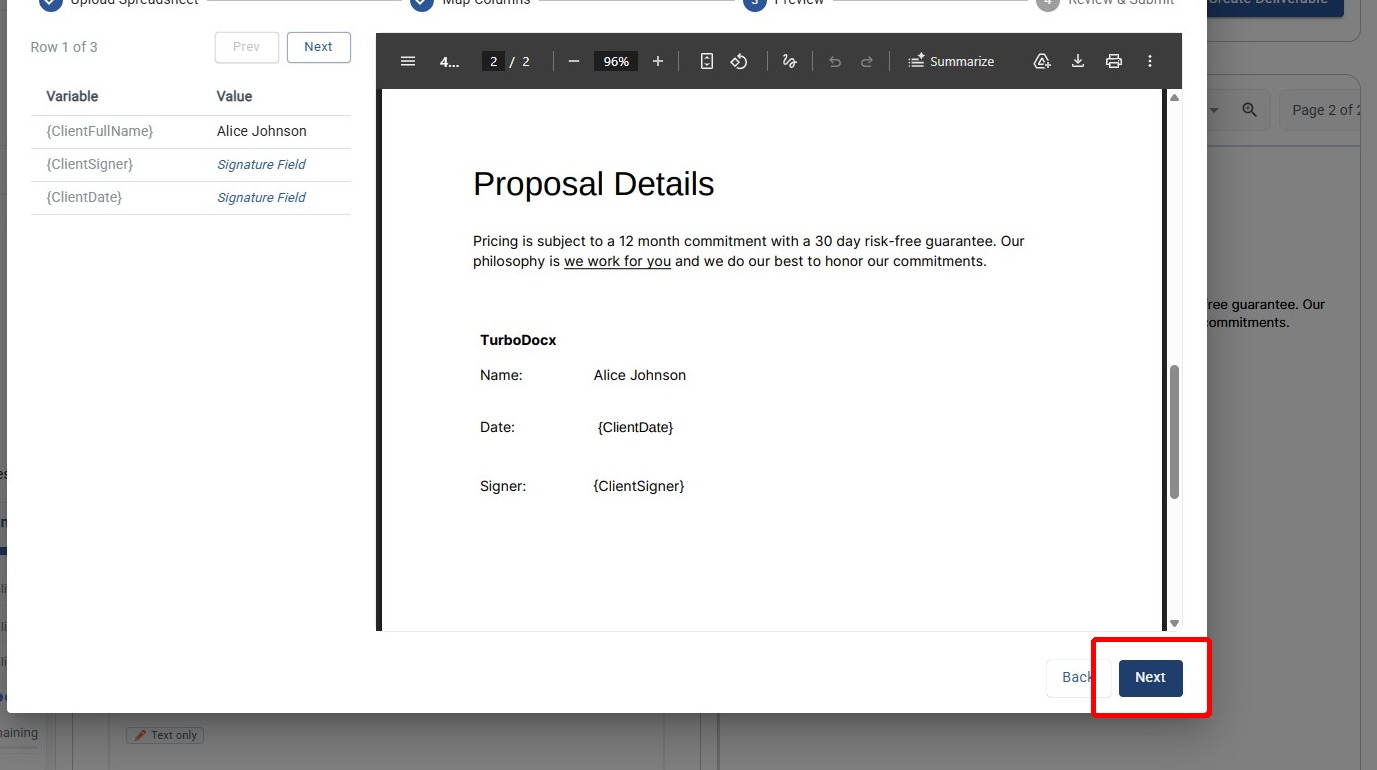
Step 4: Preview
Before submitting, you can preview exactly what each merged document will look like.
What You'll See
- PDF Preview — a rendered preview of the document with your spreadsheet data merged in
- Variable Table — a side-by-side table showing which values were inserted for the current row
- Row Navigator — Previous and Next buttons to cycle through rows and check different recipients' documents
Use this step to verify that:
- Variables are merging correctly
- The right data appears in the right places
- The document looks as expected
- Check multiple rows — don't just preview the first row. Navigate through several rows to spot formatting issues or empty fields
- Watch for long text — verify that longer values don't overflow or break the document layout
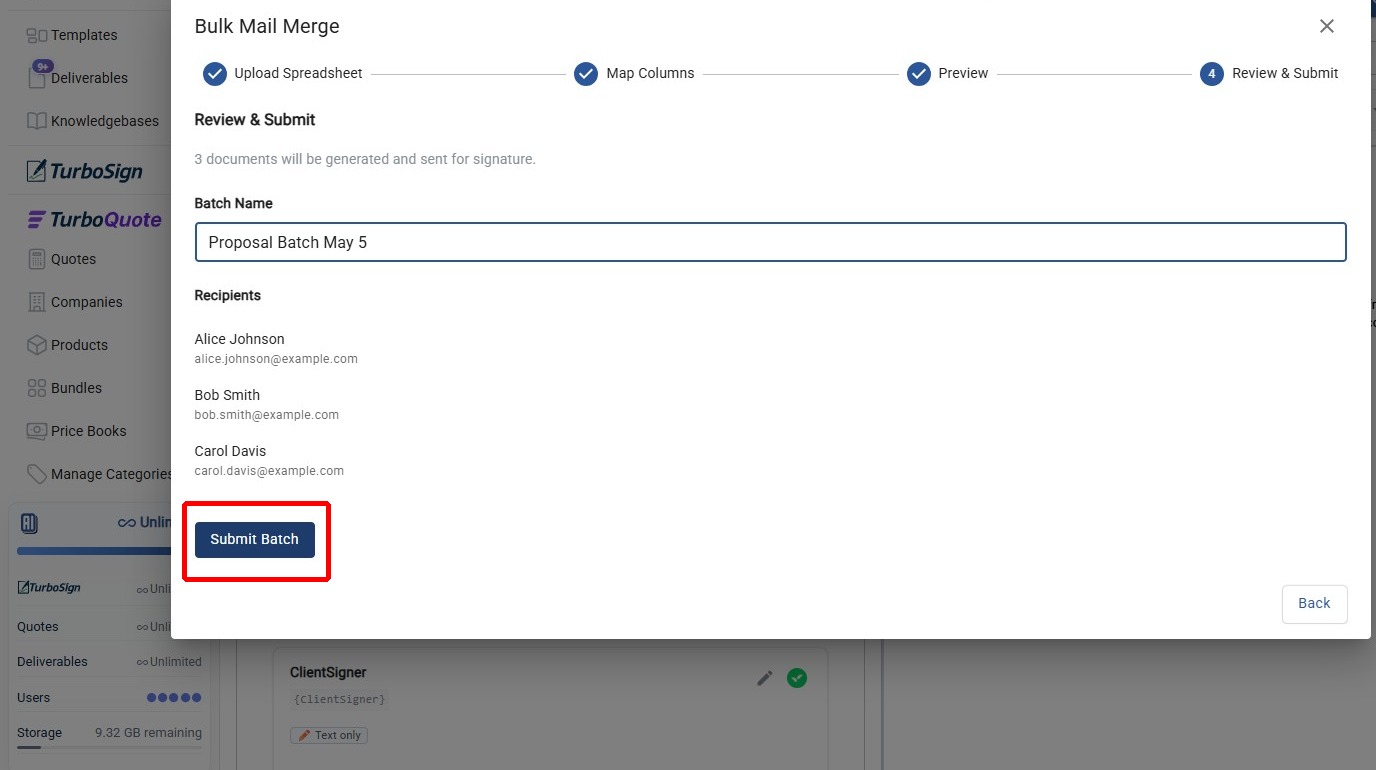
Step 5: Review & Submit
The final step before sending your batch.
What to Review
- Batch Name — give your batch a descriptive name for easy tracking (defaults to the template name)
- Recipient Summary — review the first several rows showing recipient names and emails
- Document Count — confirms how many documents will be generated and sent
Submitting
Click "Submit" to initiate batch processing. The wizard shows a loading state while submitting.
On success: the dialog closes and your batch begins processing in the background. You can monitor progress from the Batches dashboard.
Monitoring Your Batch
After submitting, navigate to the Batches dashboard to track your batch.
How to Get There
Go to E-Signatures in the sidebar, then click the "Bulk Batches" tab to navigate to the batch management page.

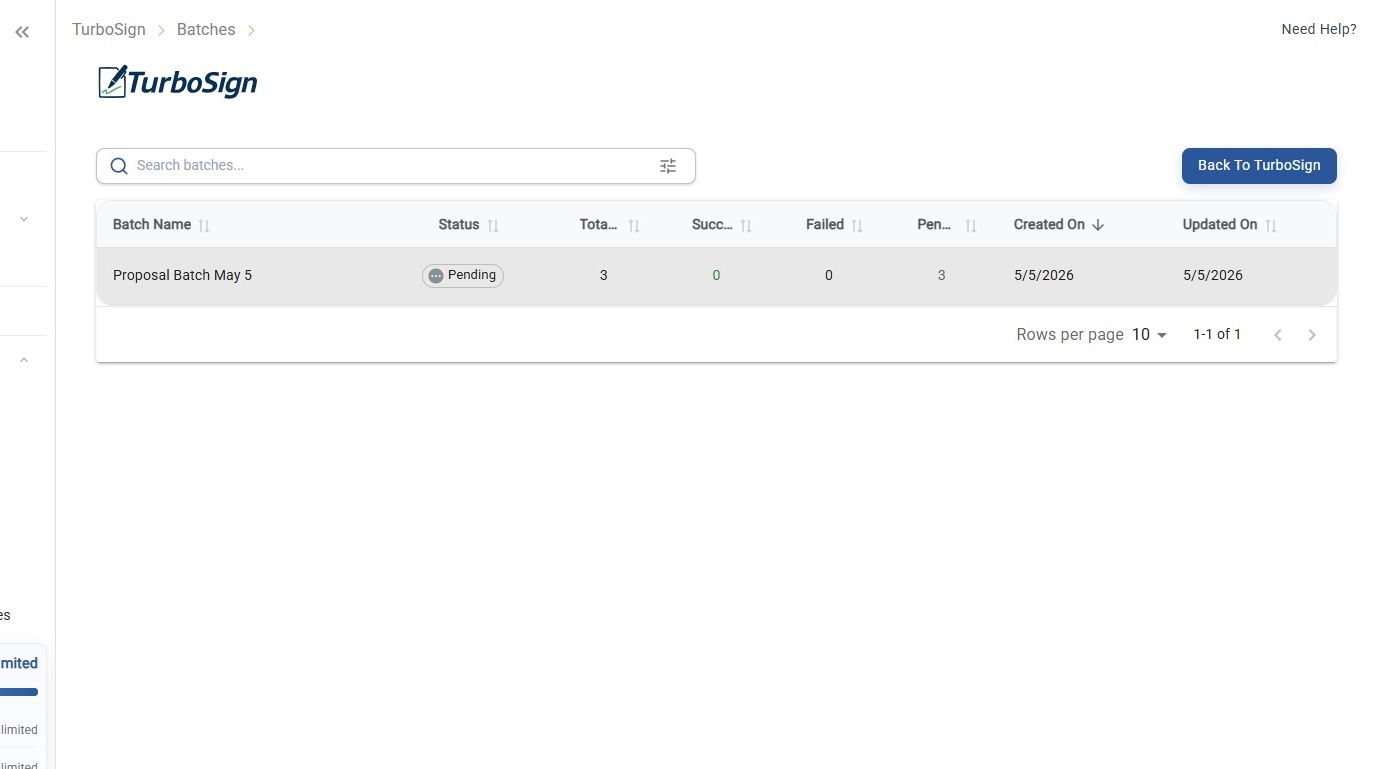
Batch Dashboard
The dashboard shows all your batches with:
| Column | Description |
|---|---|
| Batch Name | The name you assigned during submission |
| Status | Current batch status (see below) |
| Jobs | Total / Succeeded / Failed / Pending counts |
| Created | When the batch was submitted |
| Updated | When the batch was last updated |
Batch Statuses
| Status | Icon | Description |
|---|---|---|
| Pending | ⏳ | Batch is queued and waiting to start processing |
| Processing | ⏳ | Documents are being generated and sent |
| Completed | ✅ | All jobs finished (some may have failed) |
| Failed | ❌ | Batch encountered a critical error |
| Cancelled | ❌ | Batch was cancelled by user |
Filtering & Search
- Search by batch name
- Filter by status group and time period
- Sort by any column
- Paginate through large result sets
Tips & Best Practices
Spreadsheet Preparation
- Use clear column headers that closely match your template placeholder names — this maximizes auto-matching accuracy
- Validate email addresses before uploading — invalid emails cause individual job failures
- Remove empty rows at the bottom of your spreadsheet
- Keep one row per document — each row generates one document with one set of recipients
Start Small
- Test with 5-10 rows first to verify your configuration before scaling up
- Preview multiple rows to catch edge cases
- Check the Batches dashboard after your test batch to confirm all jobs succeeded
Signature Fields
- Each recipient needs at least one editable signature field — the system enforces this to ensure every signer has something to complete
- Use read-only fields for information the signer should see but not change (like a pre-filled address)
- Set sensible defaults for text fields when you already know the value
Credit Management
- 1 credit per document — a batch of 100 documents uses 100 credits, regardless of how many recipients each document has
- Credits are reserved when you submit and refunded for any failed or cancelled jobs
- Check your credit balance before submitting large batches
Troubleshooting
"The Next Button Is Disabled on Step 3"
Cause: One or more validation requirements aren't met.
Solution: Scroll through the step and look for red alert banners. They describe exactly what's missing — usually an unmapped variable, a recipient without a signature field, or an invalid email address.
Preview PDF Isn't Loading
Cause: The preview generation may be taking time for complex templates.
Solution: Wait a few moments. If it persists, try navigating to a different row and back. Ensure your template doesn't have errors that would prevent document generation.
Batch Stuck in "Processing"
Cause: Large batches take time to process. Each document goes through generation, PDF conversion, and signature request creation.
Solution: Wait for processing to complete — most batches finish within 30 minutes. Check individual job statuses in the Batches dashboard. If stuck for over an hour, contact support.
Some Jobs Failed in My Batch
Cause: Individual jobs can fail due to invalid email addresses, template errors for specific data, or transient issues.
Solution: Check the failed job's error message in the Batches dashboard. Fix the data issue and submit a new batch with just the corrected rows.
What's Next?
Now that you know how to send bulk signatures from the UI, explore these related features:
- How to Get a Document Signed — the single-document signing flow for one-off requests
- TurboSign Bulk API Integration — send bulk signatures programmatically via API
- Webhooks — get real-time notifications when documents are signed
- Managing Your Signatures — track, resend, void, and download signed documents